Contents
What is CluViz?
CluViz is a visualization tool which can be used with the Raytrix runtime. The CluViz-Engine loads various scripts that implement the drawing functionalities. The underlying CluViz-Scripts are delivered by Raytrix and cannot be customized or exchanged. You can use CluViz to display images, textures or graphical objects like circles, lines, points or even text. Raytrix offers a View Image Tool class that wraps all the mentioned functionalities. This page should give an understanding of Raytrix's View Image Tool and how you can utilize CluViz.
The following image demonstrates the general concept of working with the View Image Tool.
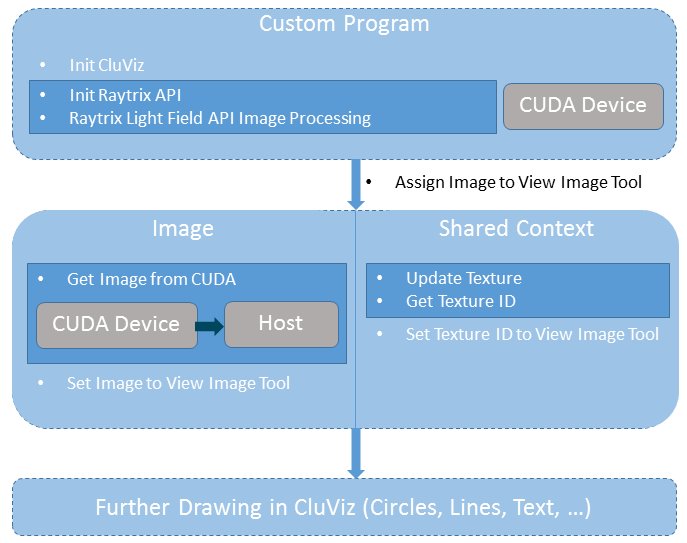
CluViz general concept
The figure above shows the three basic steps to utilize the View Image Tool.
- Set up the View Image Tool (It is essential to initialize CluViz before selecting a cuda device during the Raytrix API initialization. The main reason for that is that the rendering context must be declarated as shared beforehand.)
- Assign an image (The image assignment can be done in two different ways. To use the image information hold on the cuda device the texture id must be assigned to the View Image Tool. Using an actual image, the information must be copied into the host device memory.)
- Draw objects to scenes (Finally the figure shows that it is possible to draw other graphical objects into the CluViz scene.)
Set up the View Image Tool
To initialize the View Image Tool you must follow a specific order of a function call hierarchy. The
CLUViz::Net::ViewImageTool::ViewImageTool
class offers two different constructors. If you have chosen the constructor without a parameter you have to call
eventually. The second constructor does this implicitly.
Either way you must create a
The View-Control is a graphical user interface control that draws the context. The View-Control must be initialized differently depending on how many View-Controls are demanded in the application (see Multiple CluViz View-Controls). After initializing the View-Control, it can be added to the GUI. The best way to accomplish this task is to place a Windows Forms Panel into the GUI where the View-Control should be placed. It can be declared as it's parent later programmatically.
Furthermore you need to create a global instance of the CluViz engine to start and end it properly. Lastly you must create an instance of the View Image Tool.
- Attention
- Before you can select a cuda device for the Raytrix api you must declarate the rendering context shared beforehand.
private void FormMain_Shown(object sender, EventArgs e)
{
try
{
panelClu.Controls.Add(xCluView);
xCluView.Dock = DockStyle.Fill;
m_xViewImageTool =
new CLUViz.
Net.ViewImageTool(xCluView);
m_xViewImageTool.ViewControl.MakeCurrentSharedRC();
Rx.
Net.ApiLF.RxCudaSelectDevice(-1,
true);
}
catch (
Rx.
Net.RxException xEx)
{
MessageBox.Show(xEx.ToString());
}
}
Multiple CluViz View-Controls
In general when only one View-Control is needed you can initialize the View-Control as described above using the following parameter settings:
- Do not load the demo script
- Create a shared rendering context
- 0 -> A zero handle of the shared rendering context (The shared context is created by this View-Control)
When you need to use more than one View-Control and the both controls need to share a context you must proceed as follows:
- Initialize the first View-Control as if you would only have one (see above).
- Get the handle to the newly created shared rendering context from the first View-Control.
- Initialize the second View-Control without creating a shared rendering context but with the handle to the shared context as third parameter.
The following code example shows how two View-Controls, that share a rendering context, are initialized:
private void FormMain_Shown(object sender, EventArgs e)
{
try
{
Rx.
Net.ApiLF.RxCudaSelectDevice(-1,
true);
}
catch (
Rx.
Net.RxException xEx)
{
MessageBox.Show(xEx.ToString());
}
}
Assign an image
There are two ways to display the images of the Raytrix light field runtime:
Copy the image to the host memory
The advantage of copying the image onto the host device, is that you have the possibility to process the image yourself afterwards.
The disadvantage of copying the image is that the runtime time is increased significantly.
The following code example shows how you assign images to the View Image Tool:
private void NewImage()
{
try
{
Rx.
Net.ApiLF.RxGetImage(
Rx.
Net.ApiLF.EImgID.TotalFocus_ViewCamera, out xImage);
m_xViewImageTool.SetImage(xImage, false);
}
catch (
Rx.
Net.RxException xEx)
{
MessageBox.Show(xEx.ToString());
}
}
The function:
CLUViz::Net::ViewImageTool::SetImage
has two parameter. The first parameter is the image and the second parameter is an update flag.
- Attention
- If the image is set for the first time it is essential to set the update flag to false. Else the view image tool is not prepared properly regarding the image format.
Share the rendering context
The great advantage of using the shared rendering context is the runtime speed. The image information does not have to be copied from the cuda device.
The disadvantage is that you do not have the possibility to process the image yourself.
The following code example shows how you assign texture ids to the View Image Tool:
private void NewImage()
{
try
{
Rx.
Net.ApiLF.RxGlGetContext();
m_xViewImageTool.ViewControl.LockVis(true);
Rx.
Net.ApiLF.RxGlUpdateTex((uint)
Rx.
Net.ApiLF.EImgID.TotalFocus_ViewCamera);
m_xViewImageTool.ViewControl.LockVis(false);
uint uiTexID =
Rx.
Net.ApiLF.RxGlGetTextureID(
Rx.
Net.ApiLF.EImgID.TotalFocus_ViewCamera);
m_xViewImageTool.SetTextureID((uint)uiTexID, m_xImgFormat, true);
Rx.
Net.ApiLF.RxGlReleaseContext();
}
catch (
Rx.
Net.RxException xEx)
{
MessageBox.Show(xEx.ToString());
}
}
- Attention
- When you are working with a shared context you must ensure that all participants use the shared context mutually exclusive.
The Raytrix API offers functions to get and relase a context:
-
Rx::Net::ApiLF::RxGlGetContext
-
Rx::Net::ApiLF::RxGlReleaseContext
- Attention
- When you are updating the texture you should always lock the visualization to ensure a safe texture manipulation.
Lastly it is important that you always set the image format when you are setting the texture. This ensures that the View Image Tool is set to the right image dimensions.
Draw objects to scenes
Drawing objects and text into the View-Control can help visualizing and highlighting computational results. The View Image Tool offers four different types of objects.
- Text
- Circles
- Lines
- Points
All drawing functions exist with multiple signatures. Hence they can be easily interchanged, one signature type will be focused here. Usually all objects are drawn into the same main scene. Nevertheless you have the possibility to make a specific scenes current for all following drawing operations.
CLUViz::Net::ViewImageTool::DrawToScene
- Attention
- The programmer is responsible for clearing a scene. This can be done with:
CLUViz::Net::ViewImageTool::ClearObjectsAndText
or by using the 'Update-flag' provided by the most drawing functions.
Text
Drawing text into a scene can be very useful to demonstrate a resultant image. The following code example shows how simple text can be drawn into a scene:
private void NewImage()
{
try
{
xText.MagStep = 12;
xText.Text = "CluViz Demonstration";
m_xViewImageTool.AddText("caption", xText);
}
catch (
Rx.
Net.RxException xEx)
{
MessageBox.Show(xEx.ToString());
}
}
Circles
Drawing circles into a scene can be very useful to highlight important regions in an image. The following code example shows how circles can be drawn into a scene:
private void NewImage()
{
try
{
int iToggle = -1;
for (int i = 0; i < aCircles.Length; i++)
{
aCircles[i].
Center =
new Rx.
Net.
Vector2D((m_xImgFormat.Width / 2) + ((i * 30) * iToggle), (m_xImgFormat.Height / 2) + ((i * 30) * iToggle));
aCircles[i].Radius = 10;
iToggle *= -1;
}
m_xViewImageTool.AddCircleList("circles", aCircles, xCirclePars, false);
}
catch (
Rx.
Net.RxException xEx)
{
MessageBox.Show(xEx.ToString());
}
}
Lines
Lines are a useful tool to highlight regions in images. The following code example shows how lines can be drawn into a scene:
private void NewImage()
{
try
{
for (int i = 0; i < aLines.Length; i++)
{
aLines[i].PntList[0] =
new Rx.
Net.
Vector2D((m_xImgFormat.Width / 2) - 500, 80 + (i * 50));
aLines[i].PntList[1] =
new Rx.
Net.
Vector2D((m_xImgFormat.Width / 2) + 500, 80 + (i * 50));
}
xLineStripPars.colSelected =
System.Drawing.Color.Orange;
xLineStripPars.colPickSel =
System.Drawing.Color.OrangeRed;
xLineStripPars.fLineWidth = 5;
m_xViewImageTool.AddLineStripList("lines", aLines, xLineStripPars, false);
}
catch (
Rx.
Net.RxException xEx)
{
MessageBox.Show(xEx.ToString());
}
}
Points
Points are useful to mark interesting regions in images. The following code example shows how points can be drawn into a scene:
private void NewImage()
{
try
{
iToggle = -1;
for (int i = 0; i < aPoints.Length; i++)
{
aPoints[i].
Pnt =
new Rx.
Net.
Vector2D((m_xImgFormat.Width / 2) + (300 * iToggle), 200 + (i * 50));
iToggle *= -1;
}
m_xViewImageTool.AddPointList("points", aPoints, xPointPars, false);
}
catch (
Rx.
Net.RxException xEx)
{
MessageBox.Show(xEx.ToString());
}
}
Listen to the mouse event handler
The mouse event handler allows you to get the mouse position. This can be very useful to display mouse position related information. For example a common usecase is to display the depth information related to the image pixel under the mouse cursor. The mouse event is raised in GUI thread.
- Attention
- It is important that you do not call any functions of the CluViz engine! The CluViz engine does not allow any script executions within an handler. The handler must return so that CluViz functions can be called again. Therefore you must invoke so that this handler can return.
private void FormMain_Shown(object sender, EventArgs e)
{
try
{
xCluView.ViewMouseEvent +=
new CLUViz.
Net.ViewMouseEventHandler(OnCluViewMouseEvent);
xCluView.EnableViewMouseEvents(true);
}
catch (
Rx.
Net.RxException xEx)
{
MessageBox.Show(xEx.ToString());
}
}
{
if (xMouseEventData.bIsLeftButtonDown && xMouseEventData.bIsCtrlDown)
{
BeginInvoke(new ShowPositionHandler(OnShowImagePosition), xMouseEventData.vMouseDragLocal);
}
}
{
}
Clean up CluViz
To make sure that the View Image Tool is stopped properly the engine must be stopped.
CLUViz::Net::Engine::End
 1.8.11

