Raytrix Light Field SDK  v3.1
Logo
 All Classes Namespaces Functions Variables Typedefs Enumerations Enumerator Properties Events Groups Pages
Raytrix Light Field API Computation - Detailed

Contents

Initialize API - Prepare Image Source - Bind Image

FlowChartPart1_medium.png
Raytrix Light Field API - Initialize - Prepare Image Source - Bind Image to API

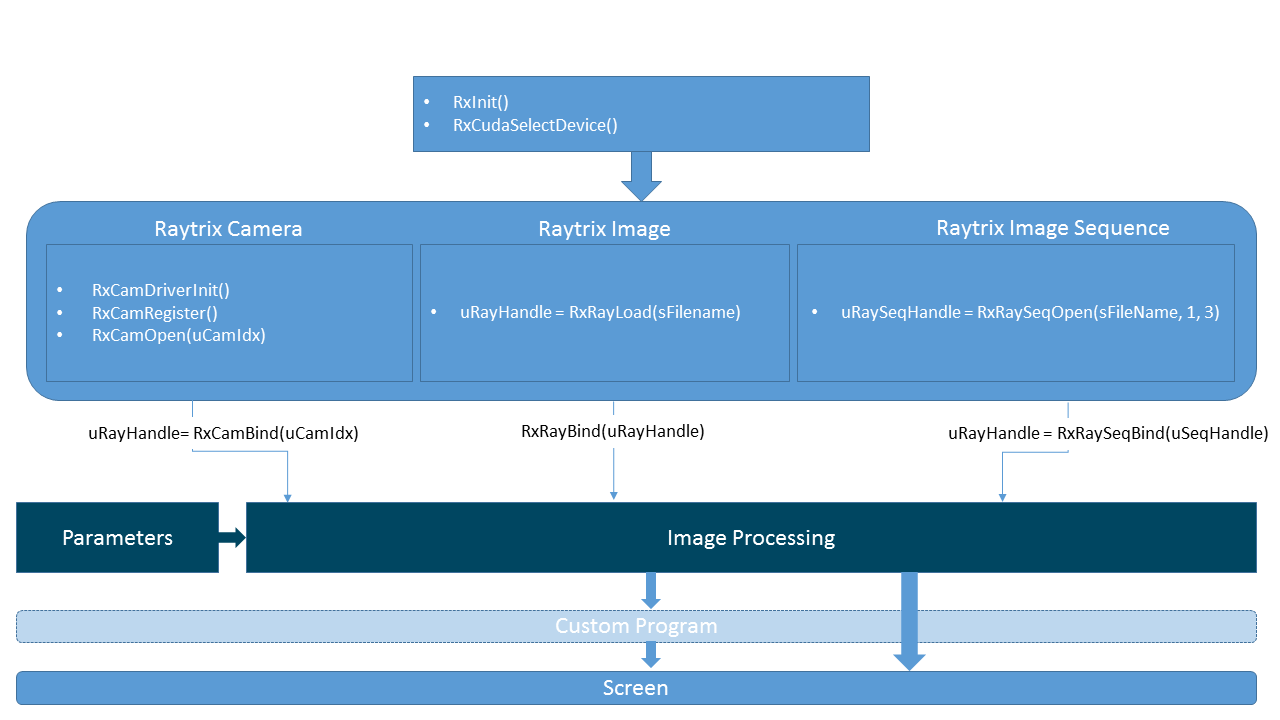
The Raytrix Light Field API can be seen as a state machine. This means that each computational step requires a specific state of the API to be in, to perform its task.

In the first section of this page the three essential initial states are explained:

  1. Initialized API
  2. Prepared Image Source
  3. Image Bound

The diagram above illustrates which Raytrix Light Field API functions to one of the states, mentioned above, lead.

For example to get the API state machine into the Initialized API state you have to call: Rx::ApiLF::RxInit. Thereafter you must select a CUDA device with Rx::ApiLF::RxCudaSelectDevice to make sure you have a CUDA device referenced on which all image processing is done.

Coming from state 1. you have the opportunity to select an image source. The Raytrix Light Field API can work with three different sources. To get to state 2. Prepared Images Source you can use the corresponding API calls for your image source of choice:

  1. Raytrix Image Source (*.ray)
  2. Raytrix Image Sequence Source (*.rays)
  3. Camera Source Lastly the final step, before you can start the actual image processing, is state 3. Image Bound. This step is essential because it copies the raw image (Rx::ApiLF::EImg::Raw) onto the CUDA device. This allows the Raytrix Light Field API user to benefit from the fast and efficient image processing computations already implemented on the graphical card.
See also
Image Processing State Machine

Image Processing State Machine

The following image illustrates a flow chart of image processing with the Raytrix Light Field API including all API calls and images that are needed for each processing step.

RaytrixFlowChart_medium.png
Raytrix Light Field API - Flow Chart of Image Processing

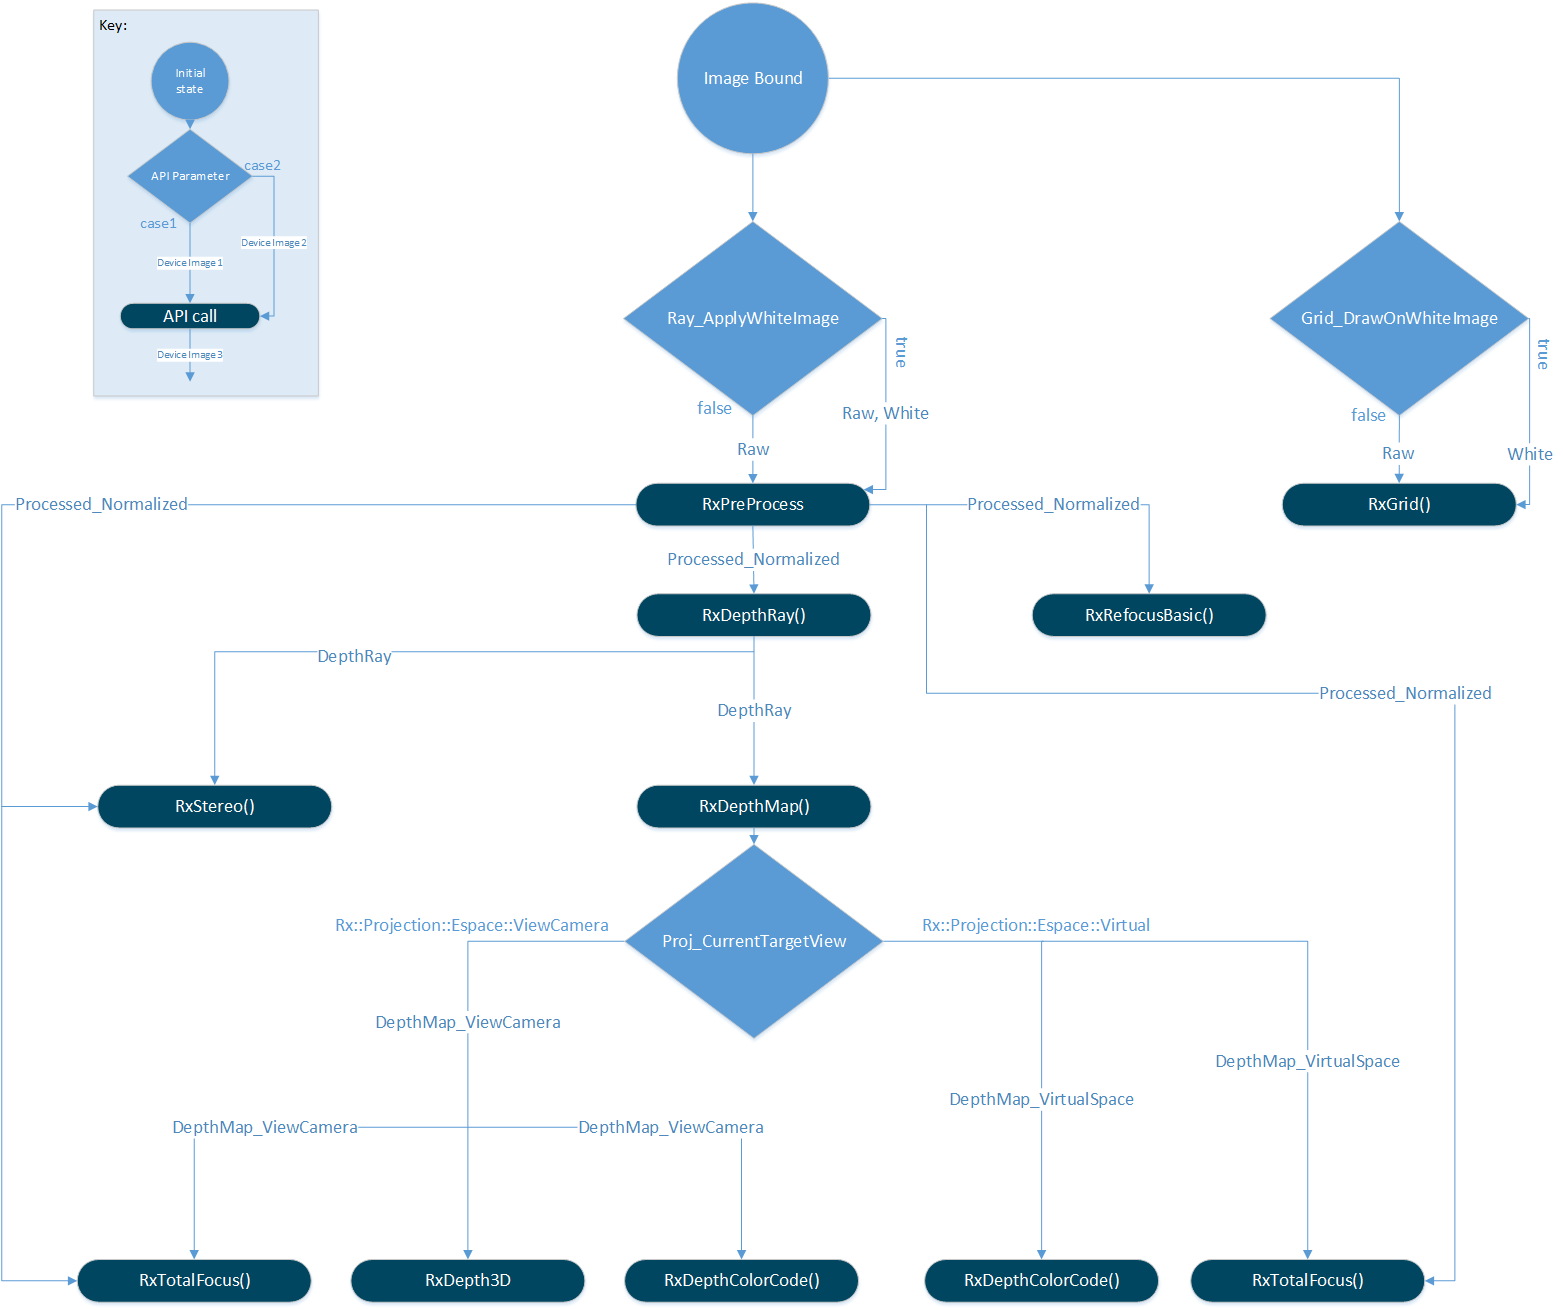
Starting from the initial state Image Bound the diagram shows nearly every path to a processed image. For example the task is to compute a total focus image of the view camera. The following steps have to be executed:

// Apply white image in preprocess = true
// Preprocess the image --> creates the Rx::ApiLF::EImg::Processed_Normalized image on the CUDA device
// Compute the raw depth map --> this step is independent of the current target space (Rx::ApiLF::EPar::Proj_CurrentTargetView)
// Creates the Rx::ApiLF::EImg::DepthRay image on the CUDA device
// After the raw depth map is computed the target space is important to determine in which space the depth values should be fused.
//Compute and create the Rx::ApiLF::EImg::DepthMap_ViewCamera image on the CUDA device
//Lastly compute the total focus image on the basis of the newly created depth map
// Apply white image in preprocess = true
// Preprocess the image --> creates the Rx::Net::ApiLF::EImg::Processed_Normalized image on the CUDA device
// Compute the raw depth map --> this step is independent of the current target space (Rx::Net::ApiLF::EPar::Proj_CurrentTargetView)
// Creates the Rx::Net::ApiLF::EImg::DepthRay image on the CUDA device
// After the raw depth map is computed the target space is important to determine in which space the depth values should be fused.
//Compute and create the Rx::ApiLF::EImg::DepthMap_ViewCamera image on the CUDA device
//Lastly compute the total focus image on the basis of the newly created depth map
// Apply white image in preprocess = true
Rx.Net.ApiLF.RxSetPar(Rx.Net.ApiLF.EPar.Ray_ApplyWhiteImage,1);
// Preprocess the image --> creates the Rx.Net.ApiLF.EImg.Processed_Normalized image on the CUDA device
Rx.Net.ApiLF.RxPreProcess();
// Compute the raw depth map --> this step is independent of the current target space (Rx.Net.ApiLF.EPar.Proj_CurrentTargetView)
// Creates the Rx.Net.ApiLF.EImg.DepthRay image on the CUDA device
Rx.Net.ApiLF.RxDepthRay();
// After the raw depth map is computed the target space is important to determine in which space the depth values should be fused.
Rx.Net.ApiLF.RxSetPar(Rx.Net.ApiLF.EPar.Proj_CurrentTargetView, Rx.Projection.ESpace.ViewCamera);
//Compute and create the Rx.ApiLF.EImg.DepthMap_ViewCamera image on the CUDA device
Rx.Net.ApiLF.RxDepthMap();
//Lastly compute the total focus image on the basis of the newly created depth map
Rx.Net.ApiLF.RxTotalFocus();
See also
Image Processing with the Raytrix Light Field API

Contents

Initialize API - Prepare Image Source - Bind Image

FlowChartPart1_medium.png
Raytrix Light Field API - Initialize - Prepare Image Source - Bind Image to API

The raytrix lightfield API can be seen as a state machine. This means that each computational step requiers a specific state of the API to be in, to performe its task.

In the first section of this page the three essential initial states are explained:

  1. Initialized API
  2. Prepared Image Source
  3. Image Bound

The diagram above illustrates which Raytrix Light Field API functions to one of the states mentioned above lead.

For example to get the API state machine into the Initialized API state you have to call: Rx::ApiLF::RxInit. Thereafter you must select a CUDA device with Rx::ApiLF::RxCudaSelectDevice to make sure you have a CUDA device referenced on which all image processing is done.

Coming from state 1. you have the opportunity to select an image source. The Raytrix Light Field API can work with three different sources. To get to state 2. Prepared Images Source you can use the cooresponding API calls for your image source of choice:

  1. Raytrix Image Source (*.ray)
  2. Raytrix Image Sequence Source (*.rays)
  3. Camera Source

Lastly the final step, before you can start the actual image processing, is state 3. Image Bound. This step is eesential because it copies the raw image (Rx::ApiLF::EImg::Raw) onto the CUDA device. This allows the Raytrix Light Field API user to benefit from the fast and efficient image processing computations already implemented on the grafical card.

See also
Image Processing State Machine

Image Processing State Machine

The following image illustrates a flow chart of image processing with the Raytrix Light Field API including all API calls and images that are needed for each processing step.

RaytrixFlowChart_medium.png
Raytrix Light Field API - Flow Chart of Image Processing
See also
Image Processing with the Raytrix Light Field API